Generate Invoices and Initiate Payments with Eddy's Automated System
Now that you've activated Self-Billing and configured your settings, you're ready to generate your first self-billed invoices and trigger payouts. Royalty accounting doesn't stop when a statement is generated; getting your artists paid quickly is important. This detailed guide will explain how to use the feature to generate and manage invoices and initiate payments, ensuring a smooth and efficient payout process.
Step 1: Generate Invoices
When setting up Self-Billing, you chose between two modes: automatic and manual. This section will explain how to create and manage invoices in both modes.
Automatic Mode
Generate Invoices by Publishing Statements
In automatic mode, invoices are created automatically when publishing statements, provided the threshold has been reached and the payee's self-billing setup is complete. If either condition is not met, no invoice will be generated.
Configuring invoice generation in automatic mode ensures that invoices are generated for existing statements as soon as the payee authorizes self-billing.
Generate Invoices for Already Published Statements
Invoices for statements published before self-billing activation or payee setup completion will be generated once the payee authorizes self-billing.
If you see any un-invoiced statements (e.g., if you change the payment status of a previously paid statement to unpaid), you can trigger invoicing manually.
Reminder
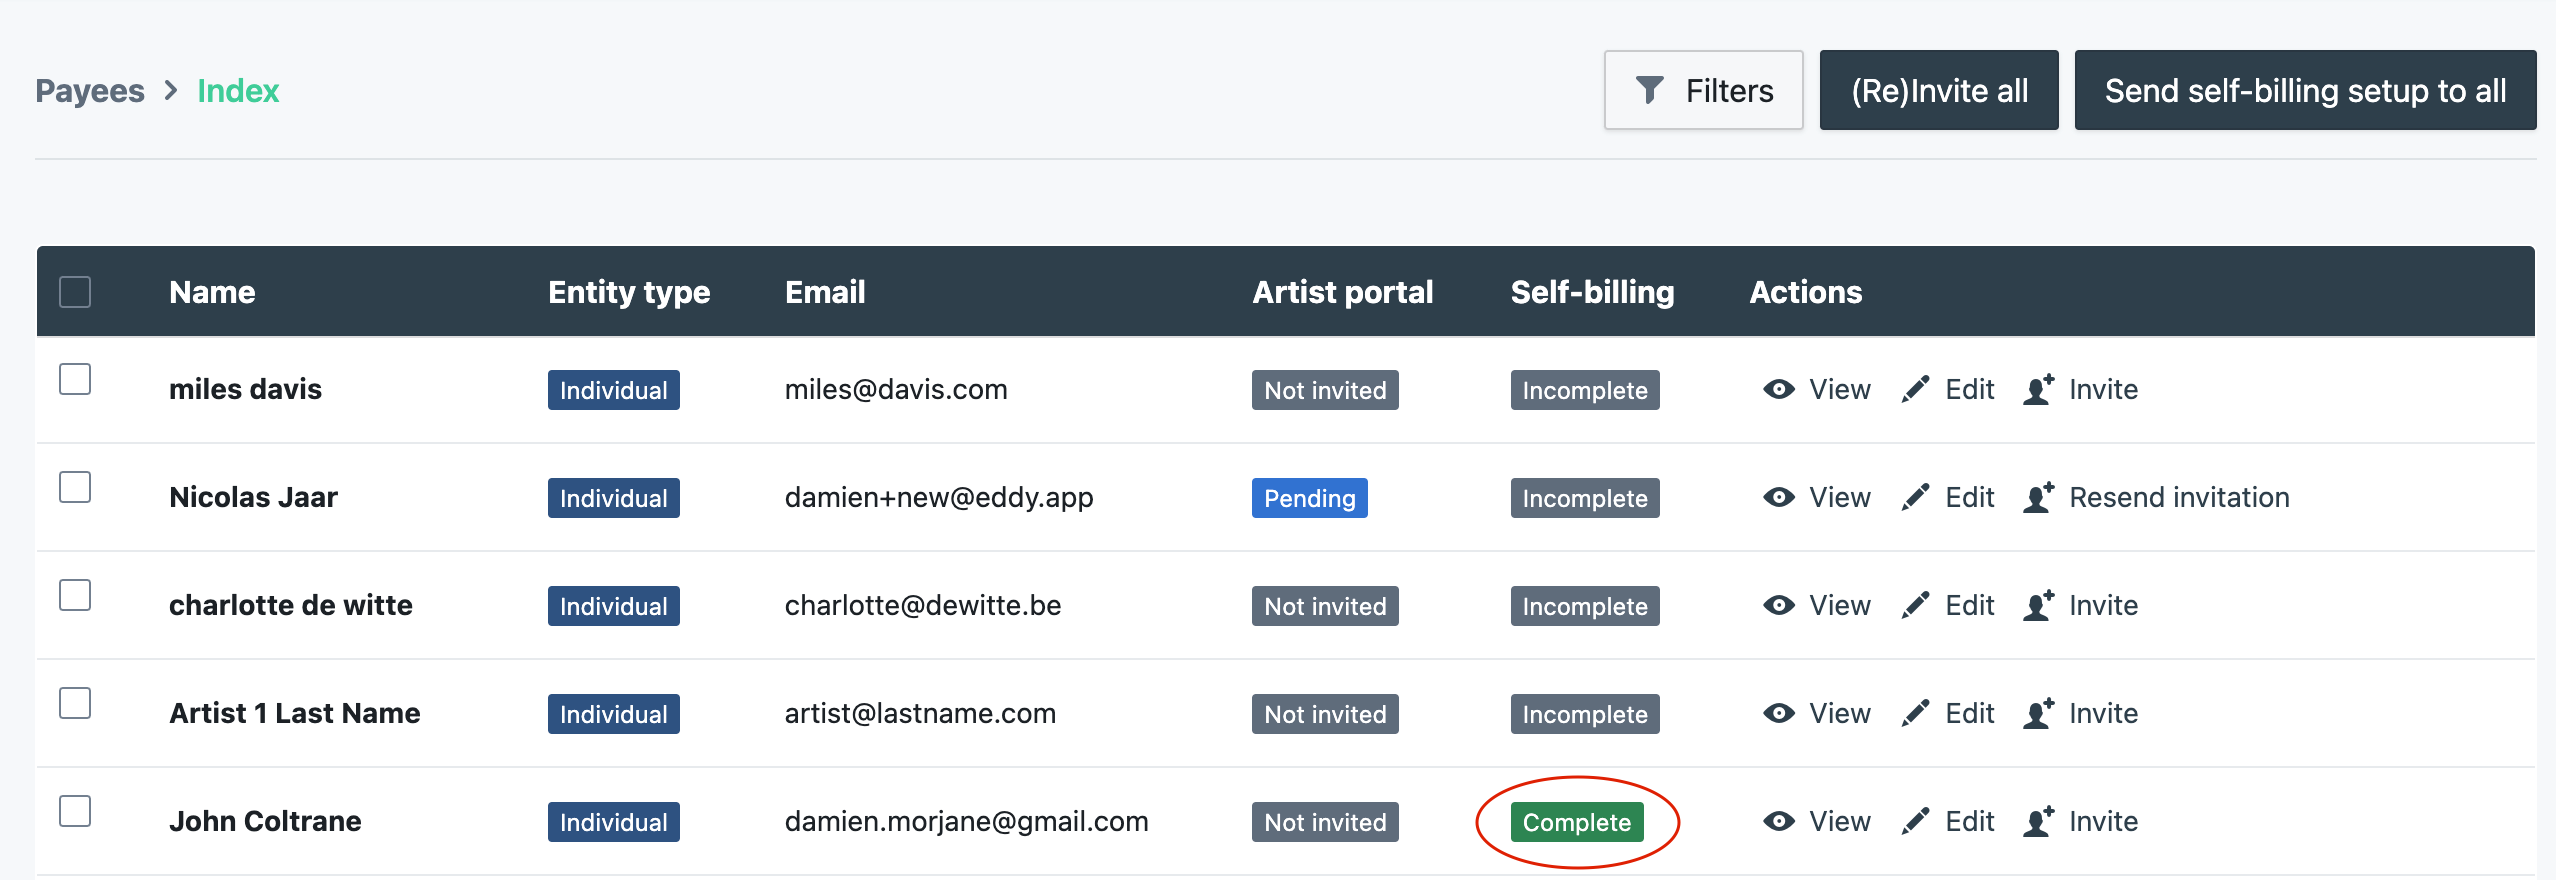
Check each payee's self-billing setup status on the Payees page.
Invoices will initially appear as drafts and will be finalized after approximately 1 hour.
Manual Mode
In manual mode, invoices must always be triggered manually; publishing statements will not generate invoices automatically.
Invoices can only be generated when the threshold is reached, and the payee's self-billing setup is complete.
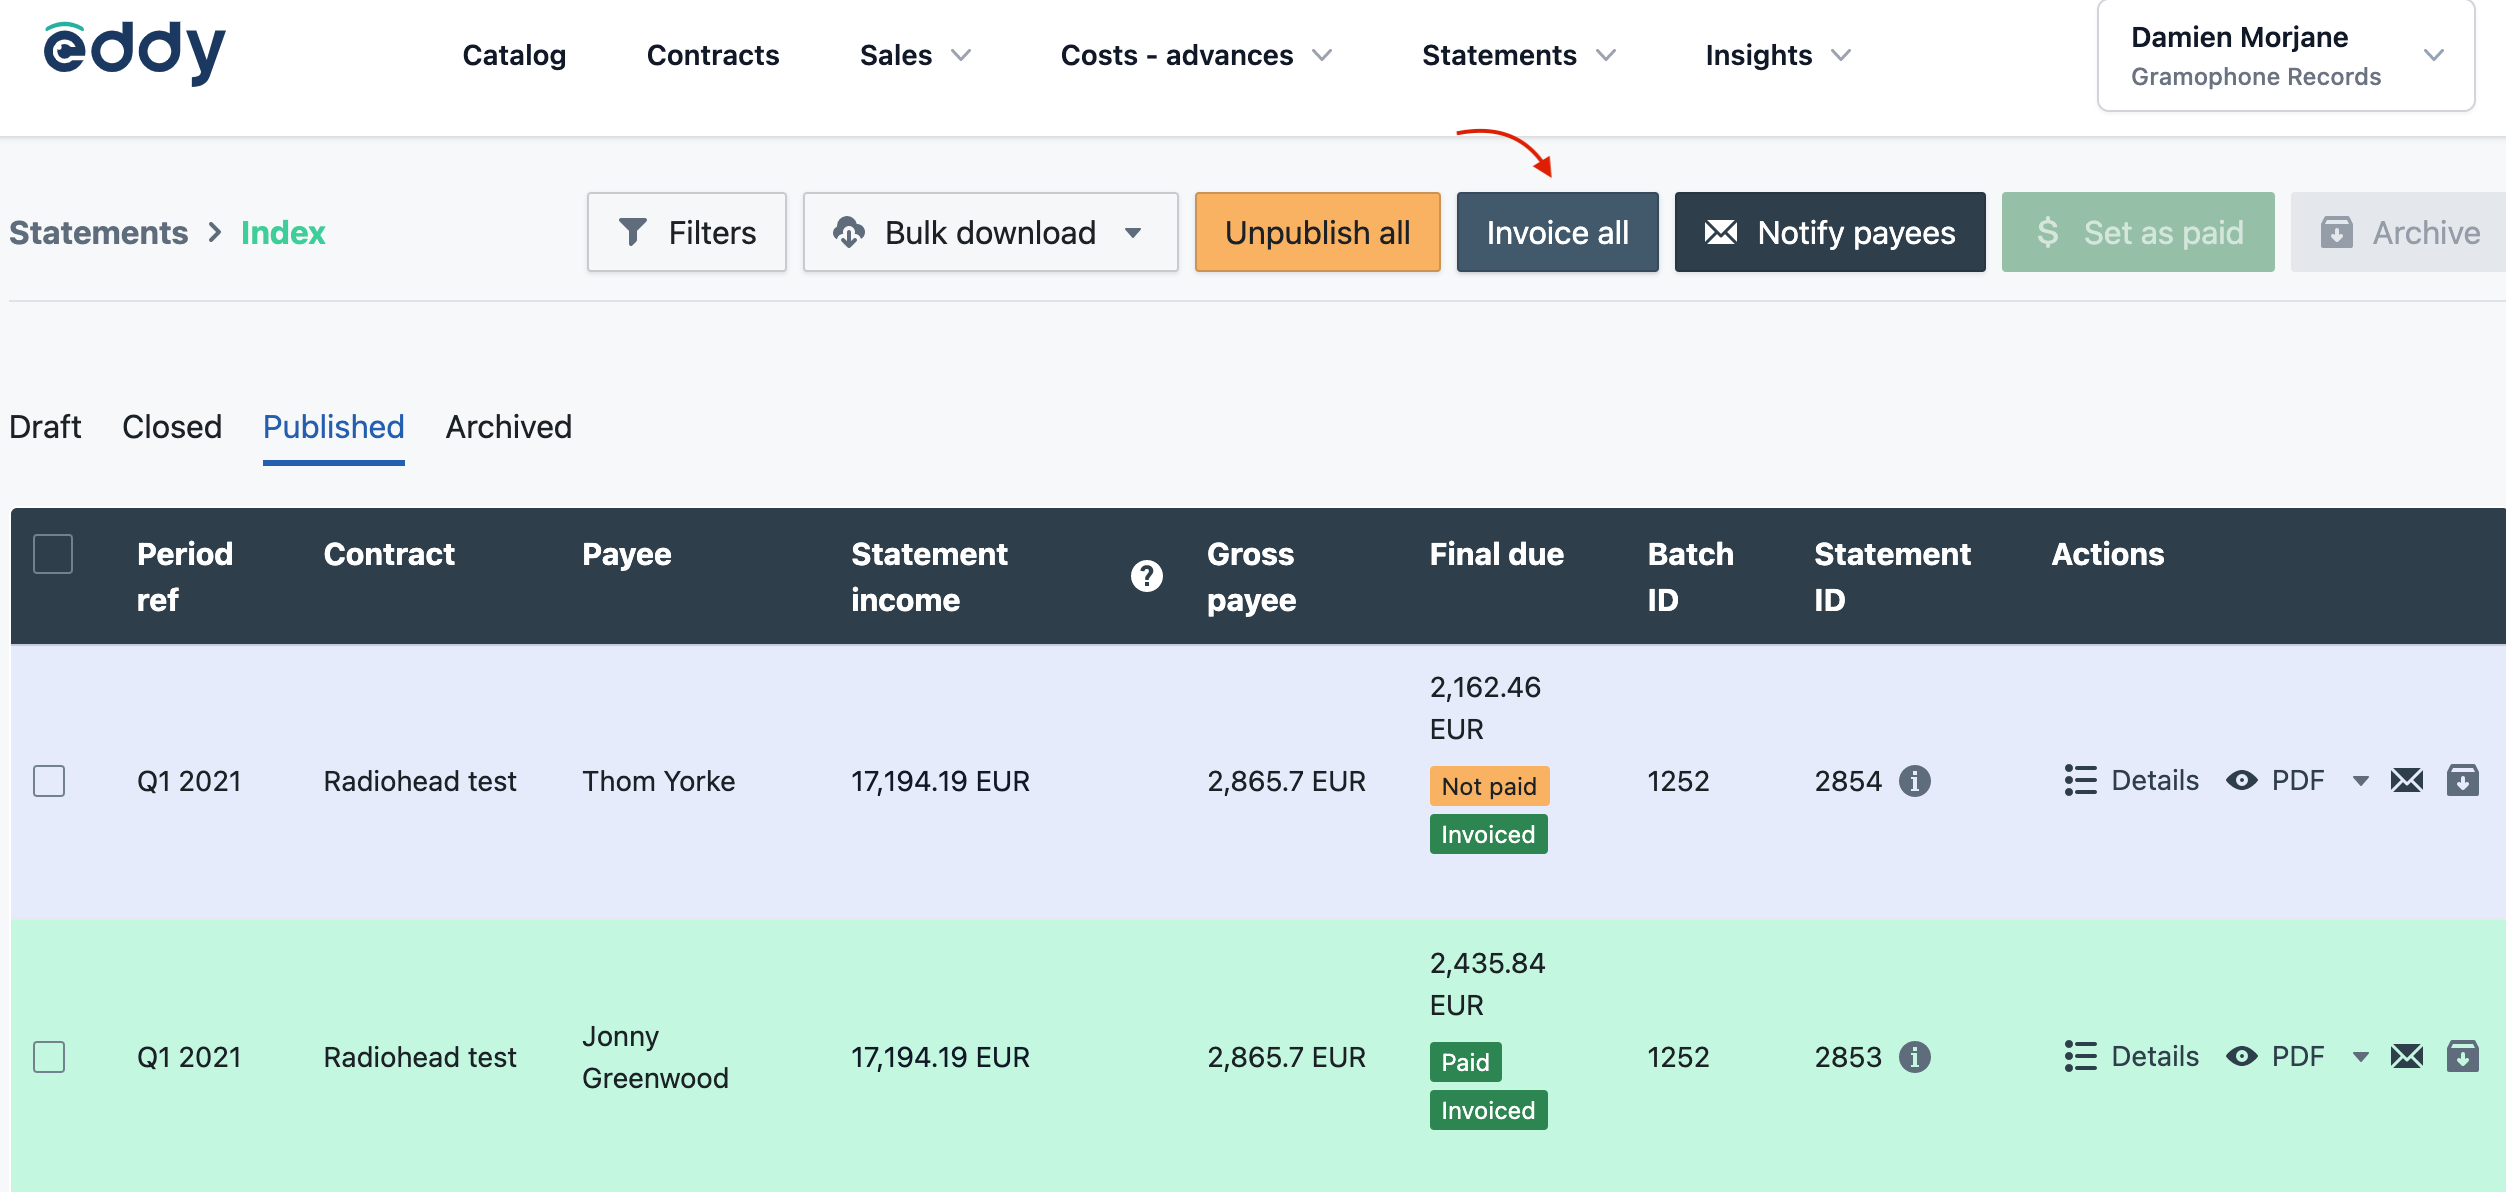
To generate invoices manually:
Click the
Invoice allbutton.Invoices will be generated for unpaid statements that meet the conditions.
Statements' Invoicing Status
Troubleshooting: Why wasn't the invoice generated?
Self-billing is not activated in your settings.
The statement was already marked as paid.
The threshold in your self-billing settings hasn't been reached.
The payee hasn't validated their billing and payment data or signed the authorization letter.
Invoices will be created only for un-invoiced statements when clicking the
Invoice allbutton.
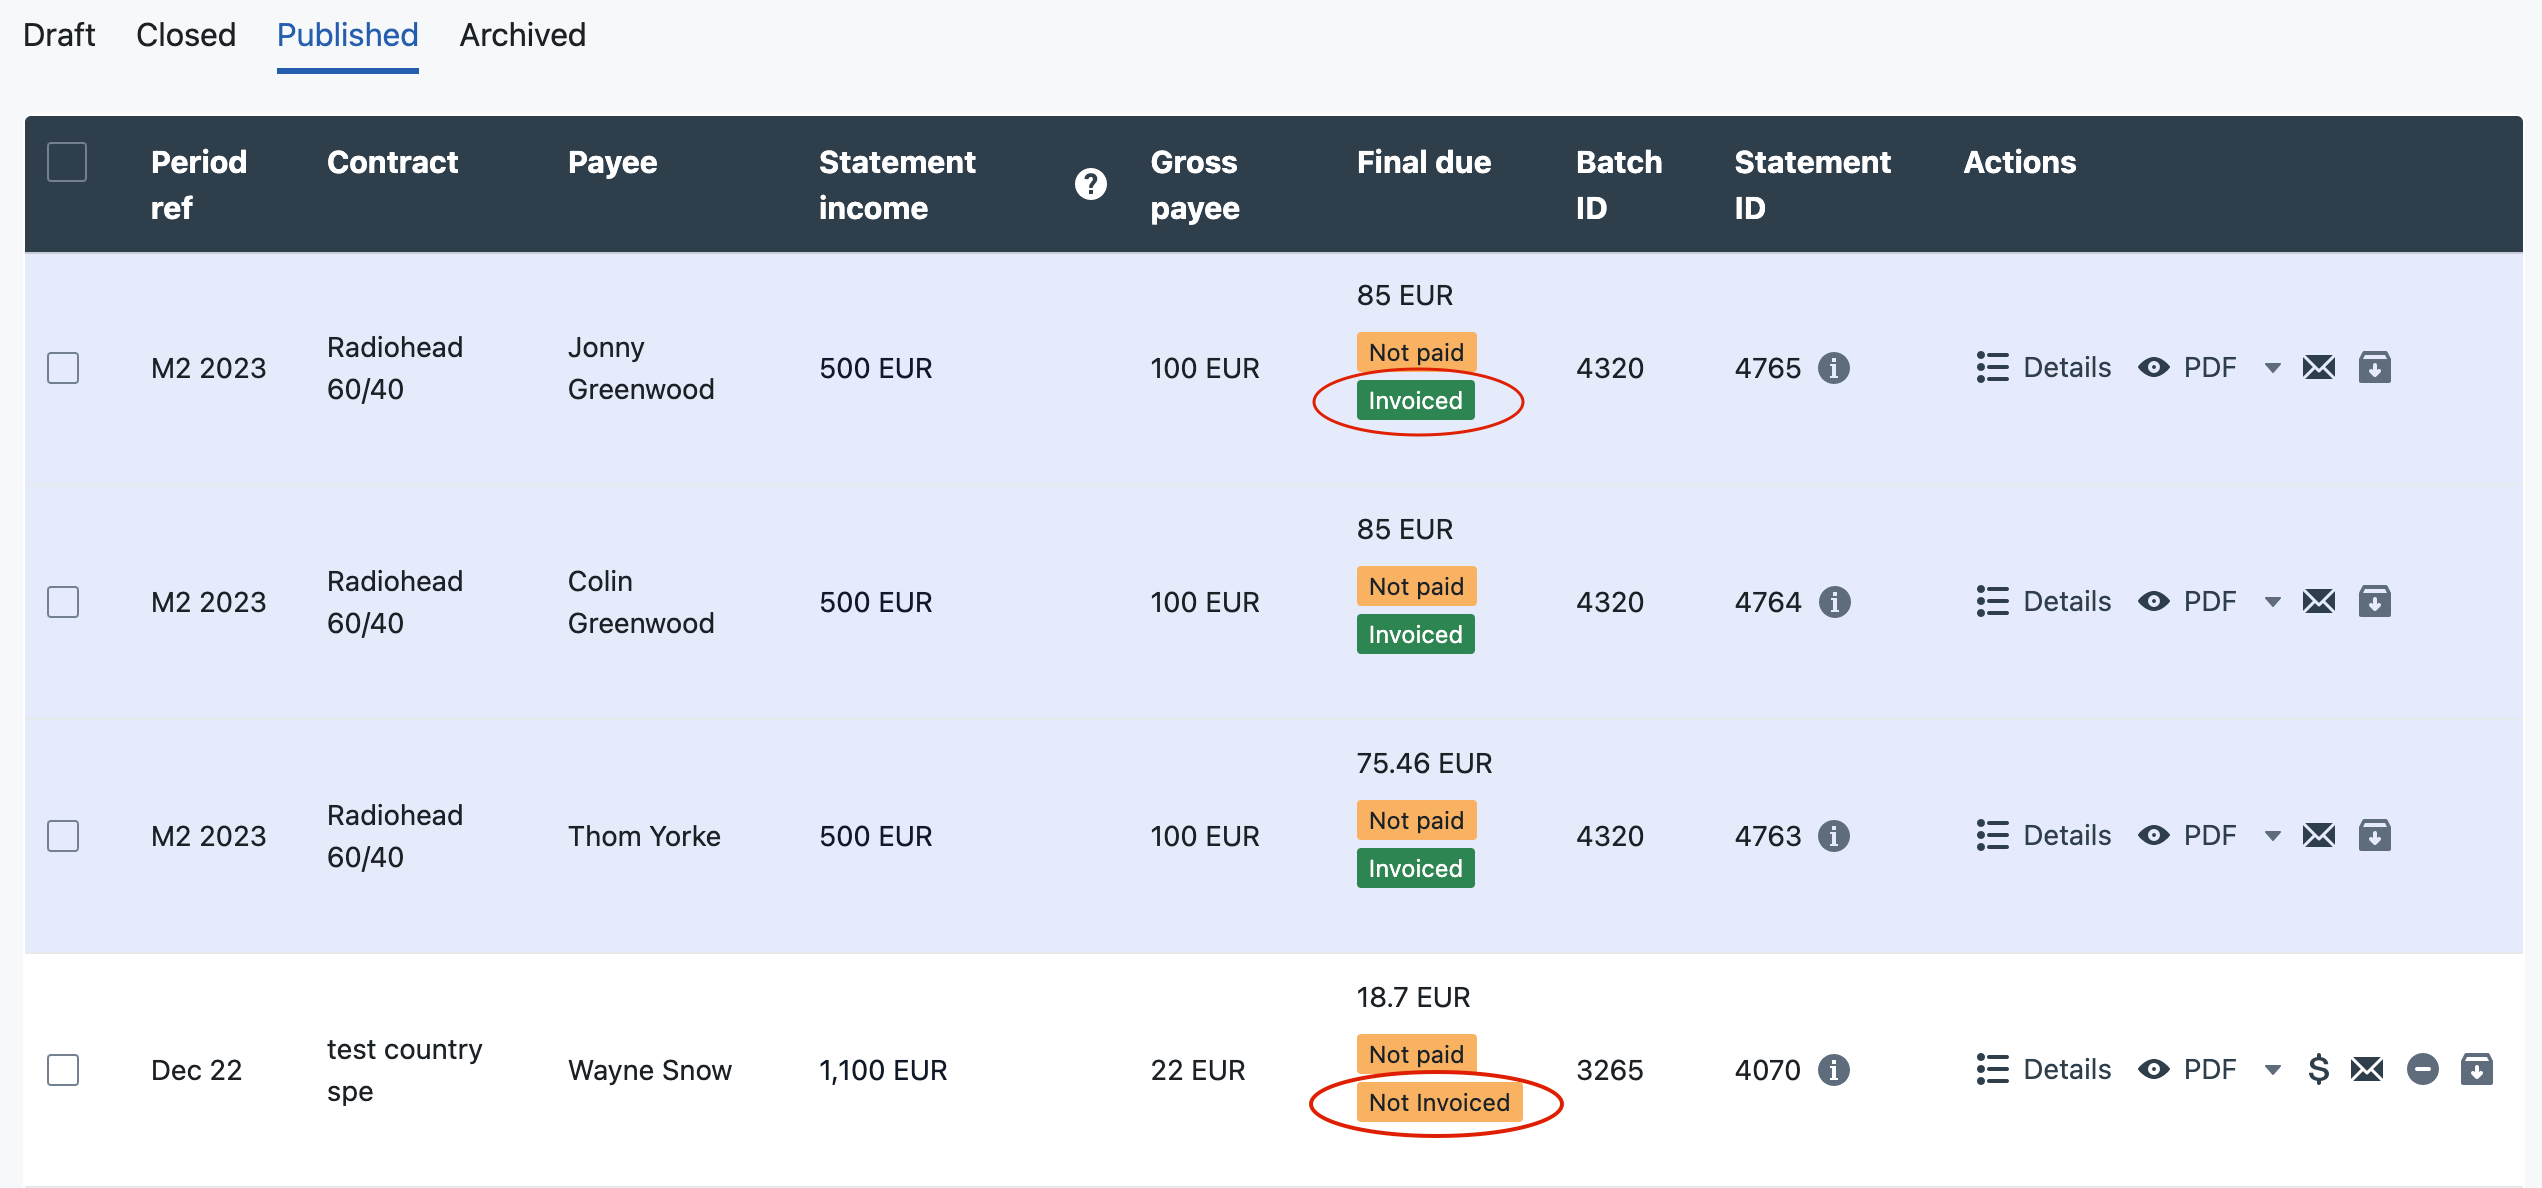
Once invoices are generated, the Invoice Status will be updated automatically for each statement, reflecting its invoicing status:
Invoiced: Statement was successfully invoiced and is ready for payment.
Not invoiced: Statement could not be invoiced due to unmet conditions (threshold not reached or payee setup incomplete).
Access Invoices
Self-billed invoices can be accessed via the
Billing - Paymentpage from theStatementsdropdown menu.From this page, manage all invoice-related actions: access or manage payment status, view PDFs, export in different formats, void and replace, and prepare invoices for payout by generating payment groups.
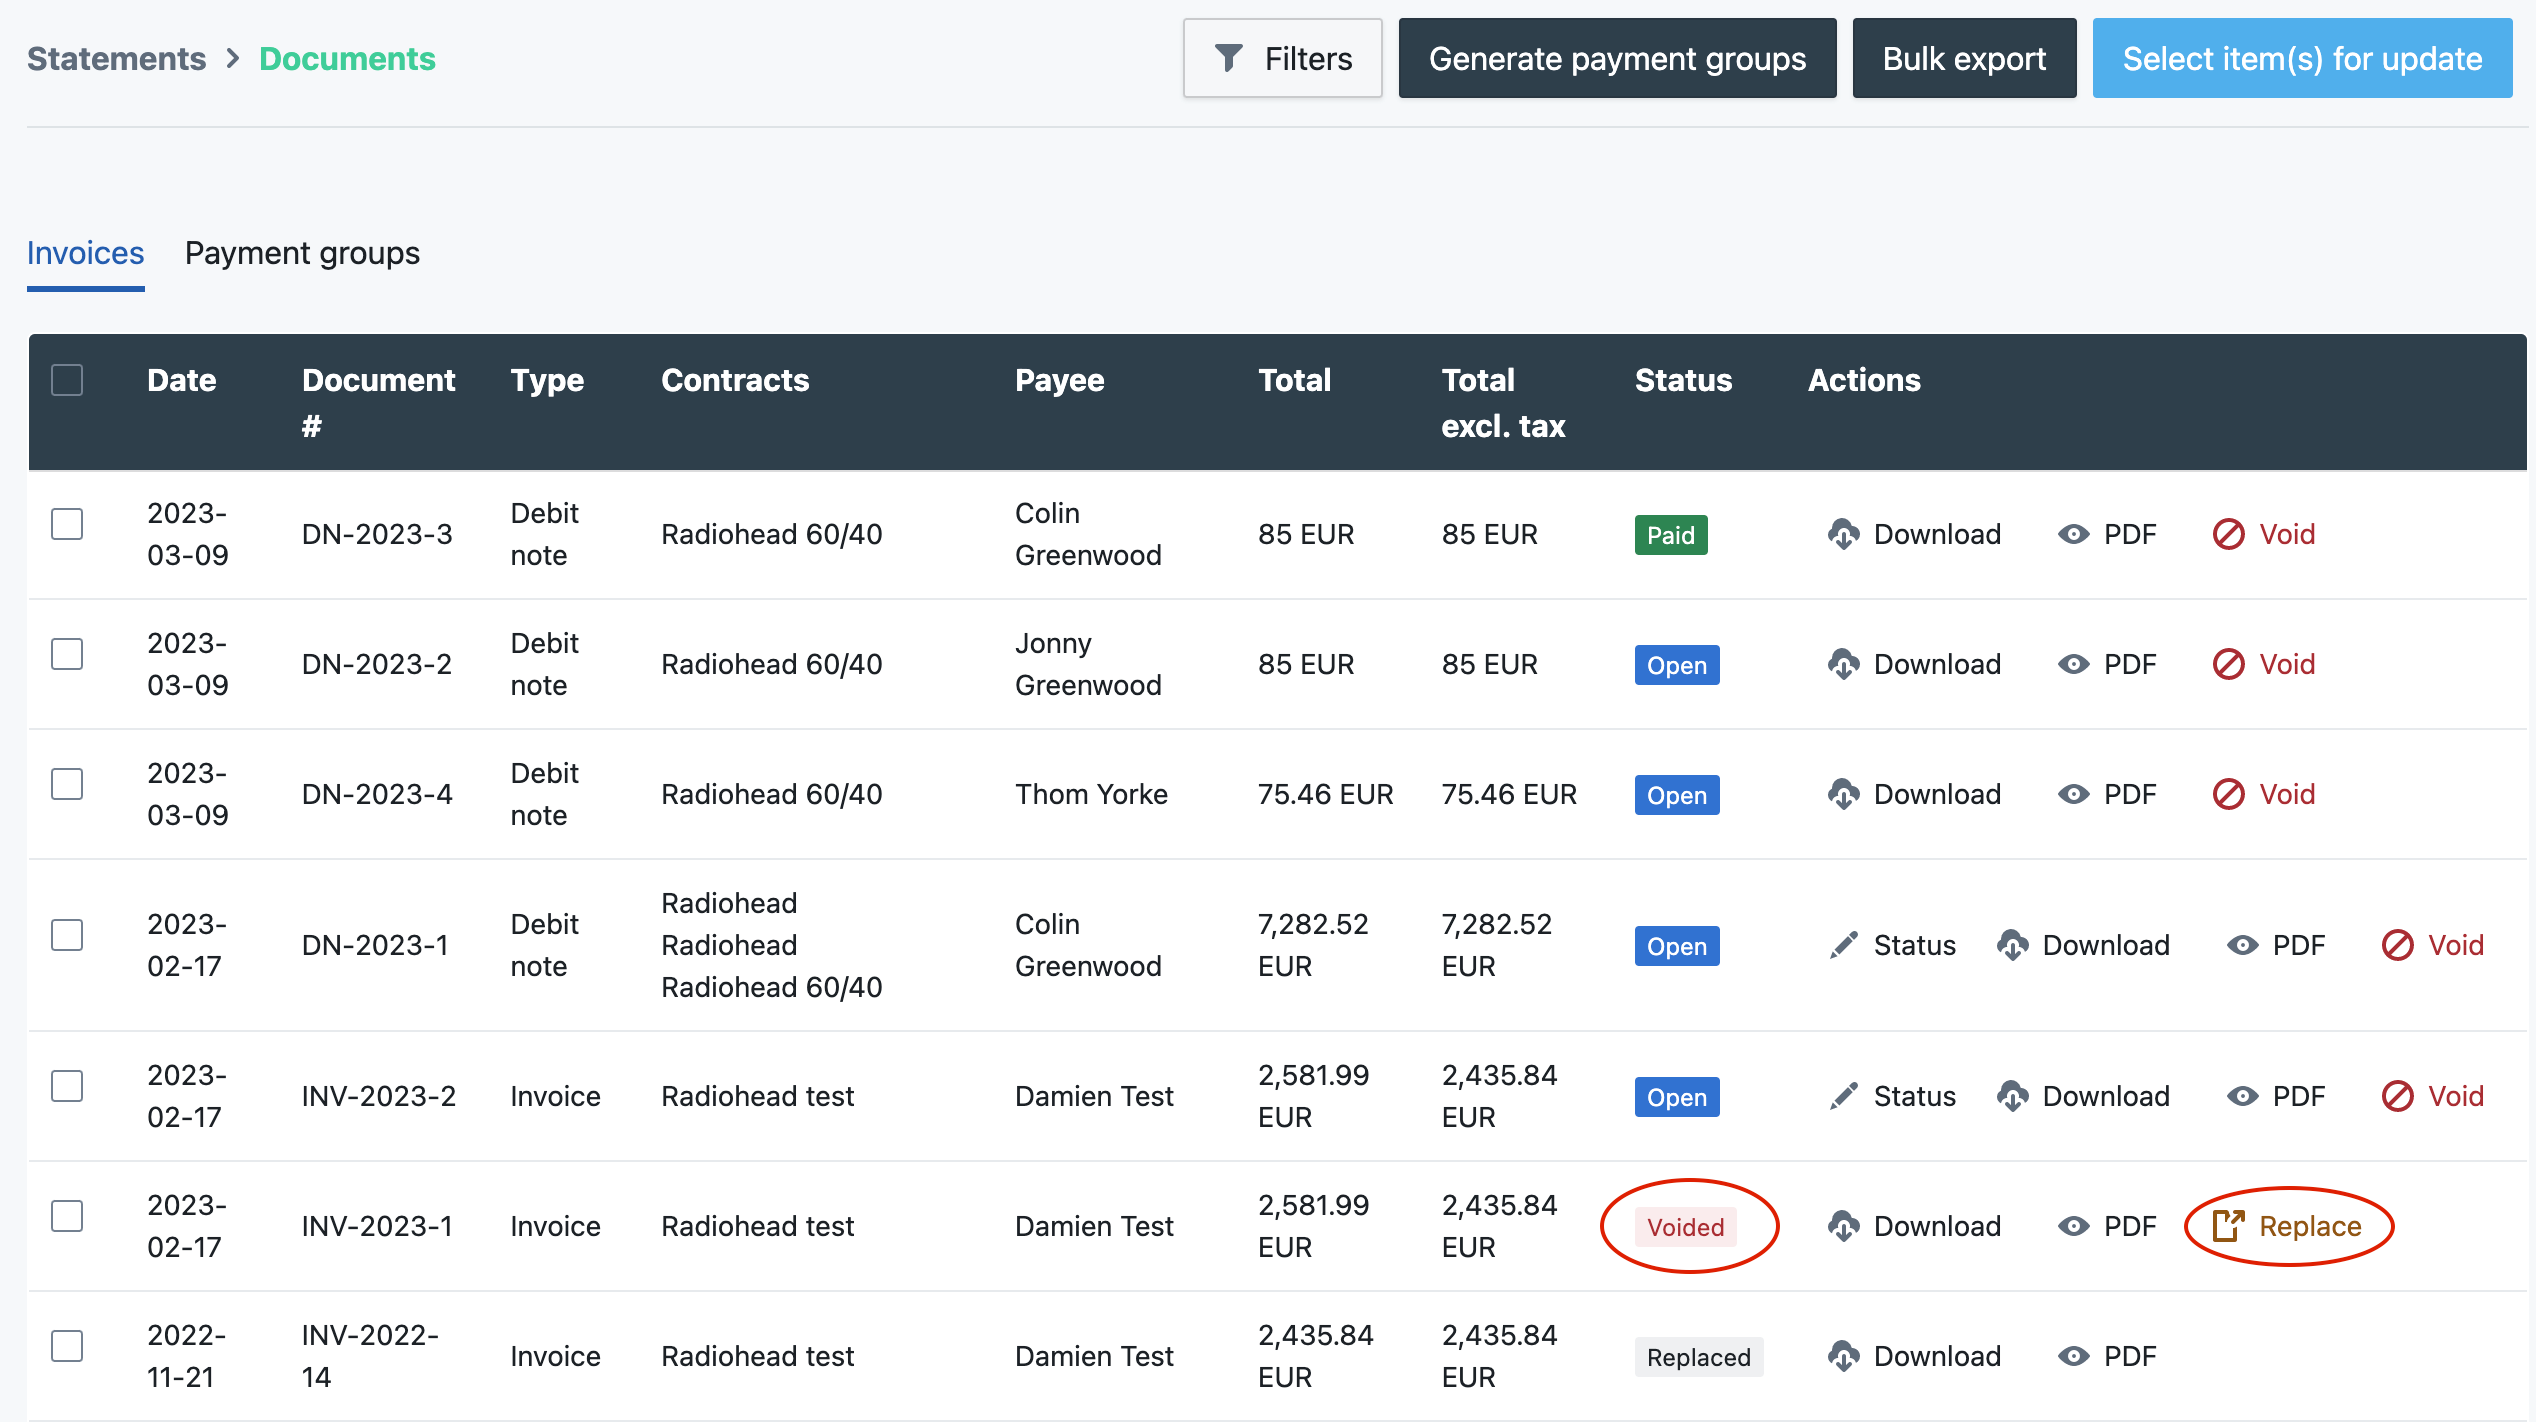
Cancel/Adjust Invoices with "Void and Replace"
As long as an invoice is a draft, it can be deleted. For compliance reasons, self-billed invoices must be kept once finalized.
If an invoice is incorrect, use the
Voidfeature to cancel it. Replace it with an updated version using theReplacebutton. The new invoice will reappear on the Payee Portal and be eligible for future payment groups.Before replacing an invoice, update the payee information accordingly.
Step 2: Initiate Payouts
Now that you've successfully generated your first self-billed invoices, it's time to initiate payments.
1. Generate Payment Groups
The first step to initiating payouts on eddy.app is to generate a payment group. A payment group is a bundle of multiple invoices, created based on your payees' chosen payment method.
Click the
Generate payment groupsbutton to start the payment process. Invoices will be grouped by payment method (Wise or PayPal).
Pro-tip
Payment groups will only be created for invoices of payees under the Wise or PayPal payment methods.
A payment group can be deleted as long as the payment has not been initiated.
2. Initiate Payments
Wise
Generate a payment group.
Click
Sendon the payment group to create it within your Wise account. This generates a batch and its transfers within Wise.Refresh your page once you see a
Paybutton. All your transfers are created within Wise and are ready to be paid out.Click
Payto initiate payment for all invoices within the payment group. Review the total amount and confirm.
Payments Group Statuses
A payment group can have one of the following statuses:
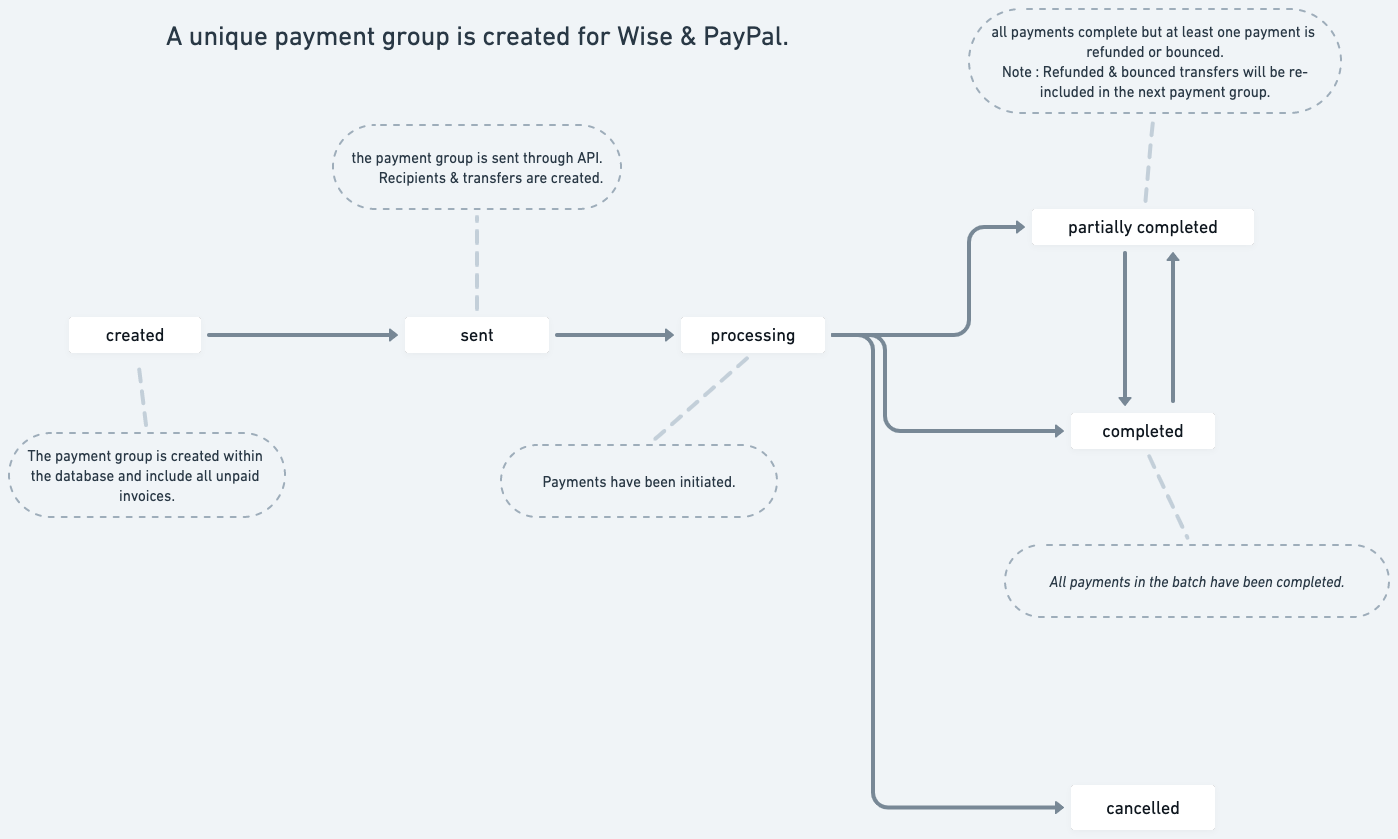
Created: Payment group includes all current unpaid invoices.
Sent: Payment group sent through the API; all recipients and transfers created within Wise.
Processing: Payments initiated.
Partially completed: Payments complete, but some payments bounced back.
Completed: All payments complete.
Canceled: Payment group canceled due to an error.
Transfer Issues
If a transfer cannot be created within Wise, the relevant transfer will be canceled and re-tried with your next payment group. If the issue persists, contact Wise and/or your payee to ensure payment details are correct.
Refunds or Bounced Payments
If a payment bounces back, ensure the payee updates their information before generating a new payment group.
Insufficient Funds
If there are insufficient funds in your Wise account the payment group funding will fail.
PayPal Payouts
PayPal payments cannot be initiated directly within eddy.app. Download the PayPal Payouts file from the Payment Groups tab and import it into PayPal. For detailed instructions, refer to the PayPal guide.
To initiate PayPal payouts:
Generate a payment group.
Download the PayPal Payouts file from the
Payment Groupstab in Eddy.app.Import the file into your PayPal account to process the payments. Refer to the PayPal guide for detailed instructions.
Invoice Payment Status
Invoice statuses update automatically (Wise) or manually (manual bank transfer and PayPal). For Wise payments, the status will be updated from open to paid automatically.
Manual bank transfer: Update payment statuses manually. Head to the Invoices section, select the invoices you have paid, and click Update status selected to mark them as paid.
Key Takeaways
Automatic and Manual Modes: Invoices can be generated automatically when publishing statements or manually, depending on your setup.
Payment Methods: Use Wise for automated payments with real-time status updates. PayPal and manual bank transfer options are also available.
Generating Payment Groups: Payment groups bundle multiple invoices based on payment methods, streamlining the payout process.
Security: Protect your API keys and public keys. Never share them, and if a breach is suspected, delete and regenerate them immediately.
Payee Involvement: Ensure your payees validate their billing and payment information to enable seamless invoicing and payments.
For further details, refer to the following links: